

Contents » Recipe : Tips : Variations : Inspiration : Resources
Banana bread is a fantastic way to use up overripe bananas, but the typical recipes are packed to the rafters with sugar, even the vegan ones.
They also tend to use flour for bulk, plus oil to keep the bread moist.
And I’m really keen to use as many whole foods as possible in my recipes these days.
So I created this healthy wholefood vegan banana bread recipe.
It’s gluten-free, paleo and naturally sweetened. How about that?
Getting the moisture levels right is one of the trickiest things when you’re making banana bread.
Too much banana or liquid, and you end up with a sticky, goopy lump.
Too little, and the banana bread is dry and crumbly.
But this gluten free banana bread recipe is just right…

And I’m totally in love with the fact that it uses no refined ingredients whatsoever (apart from a teaspoon of baking powder, that is).
No flour, no coconut oil, no liquid sweeteners, just whole, unprocessed, plant-based ingredients.
And it’s gluten-free as well. In fact it doesn’t contain any grains at all.

Of course, apart from this vegan banana bread’s impressive health pedigree, it also happens to taste absolutely, freaking amazing.
So good that I’m happy to eat the dough straight off the spoon.
So delicious that none of it’s lasted long enough to make it into the freezer.
So tasty that I could happily eat this all day long.
(Sheesh! Writing these posts makes me SO hungry!)
It’s perfect as a snack, for afternoon tea, morning tea, a before bed snack, breakfast, lunch, dinner, elevenses, and yes, maybe even second breakfast.
So if you’re looking for a way to use up those black, spotty overripe bananas, without whacking your body with a bunch of processed ingredients, I think you’ll be VERY satisfied with my paleo vegan gluten-free banana bread.
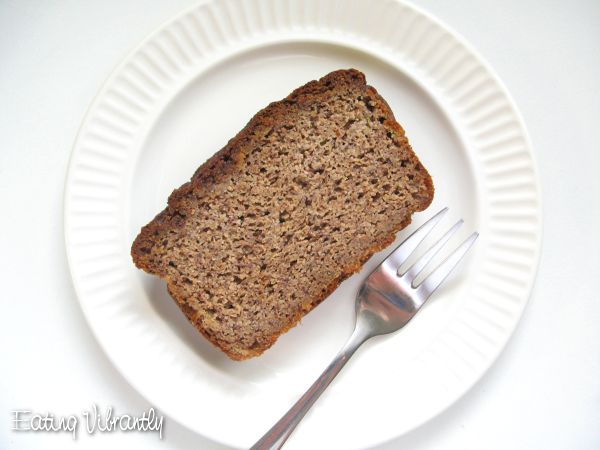
Healthy Vegan Banana Bread recipe
Make sure to read the tips below the recipe to get the most out of this amazing wholefood vegan banana bread recipe.

Wholefood Vegan Banana Bread
Ingredients
- 2 cups almond meal (250g)
- 1 tsp baking soda
- 1/2 tsp vanilla bean powder or 2 tsp vanilla extract
- 1/4 cup medjool dates (60g)
- 1/2 cup water (125g)
- 4 tsp lemon juice (20ml)
- 1/3 cup hemp seeds / hearts , heaped (60g)
- 3 med bananas , mashed (350g)
- 1/3 cup flaxseed / linseed meal (80ml)
Method
- (If required) Grind almonds into meal and pass through a sieve to remove lumps.
- Place almond meal into a large bowl and add baking soda and vanilla powder. Mix thoroughly.
- Put dates, water and lemon juice into a blender. Blend until dates are finely chopped.
- Add hemp seeds to blender, and blend until smooth.
- Mash bananas thoroughly by hand and pour date-hemp mix on top. Mix thoroughly.
- Add flax meal to banana-date-hemp mix and combine thoroughly. Leave to sit for 5 mins for flax to begin thickening up.
- Add wet ingredients to dry ingredients and fold through until ingredients are well combined, but no more.
- Spoon/pour mixture into a small loaf tin, lined with baking paper.
- Cover loosely with foil and cook at 180ºC/356ºF for 45 minutes, then remove foil and cook for a further 60 minutes.
- Leave on rack to cool for at least 1 hour, then slice and serve.
Preparation
- Before: -
- During: 30 mins
- After: 105 mins + cooling time
- Need: Blender, oven
Nutrition Information
Tips
- I prefer to make my almond meal on the spot, by whizzing it up in my Vitamix, and then passing it through a sieve to remove any lumps. But you could definitely use pre-packaged almond meal for convenience if you prefer.
- I did try making this recipe with leftover almond meal pulp, but I found that the texture was a bit funny, and the loaf came out a lot denser than with whole almond meal. I’ll find a way to use up that leftover almond milk pulp one day…
- Make sure you’re using baking soda (also called sodium bicarbonate or bicarb soda) and not baking powder. I use the lemon juice to set off the reaction with the baking soda, so if you use baking powder, the “acid base” balance will be completely off and it won’t rise as well or turn out nearly as nice.
- You can make your own vanilla bean powder by air-drying fresh vanilla beans and grinding them into a powder using a spice blender or coffee grinder. You can also buy it from your local health food shop. If you can’t get your hands on any of this, you can just scrape out a fresh vanilla bean or two into the mix, or add 1-2 tsp of vanilla extract.
- I use lovely Medjool dates for this recipe. They’re big, sweet, soft and sticky dates that you usually find in the fresh produce section, or at your local health food store. If you’re using regular dates, you’ll need to soak them in water for a couple of hours first. Drain them, but keep the soak water to use in the recipe, for an extra date-y taste.
- This vegan banana bread doesn’t turn out excessively sweet, so if you’re used to a much sweeter-tasting banana bread, then I’d suggest you double the amount of dates to begin with. Just gradually work your way down to the standard amount as your taste buds adjust.
- I included hemp seeds in this recipe for healthy fats and protein, and to save me having to use coconut oil (which I love, but it’s not a wholefood). Hemp seeds (also called hemp hearts) are packed with 35% protein, all the essential amino acids, the perfect ratio of Omega 3 to Omega 6 fats, other essential fatty acids, and fibre. I love them and they definitely add the required moisture to this recipe.
- If you don’t have access to hemp seeds, you could try using sunflower seeds, or even cashews, but I haven’t tried this with either of those, so I can’t say for sure how they will turn out.
- At a pinch, you could probably use coconut oil in place of the hemp seeds, but I would reduce the amount by half to avoid over-greasing the recipe. You’ll just have to play with the amounts and see what works for you.
- As I mentioned above, the lemon juice is the “acid” part of the rising agent, when paired with the baking soda. Together they react and create air bubbles that help the bread to rise and be less dense. I like to use my lemon juice fresh, but if you only have bottled, give it a try and see how you go.
- The bananas are the key ingredient in this recipe, and they need to be super ripe for this to really work. Go for bananas with lots of black spots, that are so ripe they’re almost falling apart.
- The flax meal is important for binding the recipe together. I either grind my flax seeds (also called linseeds) fresh, or I keep my flax meal in the freezer, ready to go at a moment’s notice. The oils in flax are really unstable and go rancid really quickly once the seeds are ground.
- Flax seeds contain really high amounts of Omega 3, so apart from their fantastic binding abilities, I included them in this recipe to balance out all of the Omega 6 fats from the almonds. The final result has a 3.5:1 ratio, which is super close to the ideal ratio of 3:1, so I’m pretty happy with that.
- The order and timing of the steps is pretty important, especially adding the flax and mixing the wet ingredients with the dry ingredients. If the flax meal doesn’t sit in the wet ingredients for long enough, it won’t bind as well and bread won’t rise as much. And equally, if you mix the wet and dry ingredients too much, then the lemon and bicarb react too much, and you start to lose the precious bubbles from your bread.
- I tried cooking this bread at a hotter temperature, but the loaf ended up burning (even with the foil) and not cooking properly in the middle, so I finally settled on the 180ºC/356ºF, which seems to work really well. I also didn’t cook my loaf for long enough the first few times, so don’t worry about overcooking it a bit. Better to be overcooked than undercooked.
- This gluten-free banana bread is so delicious that it’s never lasted long enough in my house to make it to the freezer. However, based on the texture of it, I would say it would fare really well frozen. I would slice it up first, and wrap the slices individually, and allow the slices to thaw in the fridge overnight (if you have the patience for that).
Variations
- Some classic banana bread recipes add crushed or chopped nuts to the top of the load before baking. I’ve never done this because, well, I couldn’t be bothered, but you could definitely play around with this. Just keep an eye on the toppings as the loaf cooks, to ensure they don’t burn.
- This vegan banana bread is not overly sweet, because that’s how I like things these days. If you have a strong sweet tooth, then you might want to double the amount of dates, to make a sweeter-tasting loaf. It shouldn’t affect the loaf’s texture too much, and will also add even more healthy fibre.
- You could also try stirring in some extras just before you add the dough to the pan. Things like chopped walnuts, chocolate chips, dried apricot pieces, sultanas or even dried blueberries could work quite well, but I haven’t tried any of these, so just experiment and see what you like.
- This dough seems like it would work really well as muffins or cupcakes. Again, I haven’t actually tried this myself, but the dough has the strength to rise enough to make a dense but hearty snack-sized treat. The cooking times would reduce greatly if you turn this mix into muffins, so start with 20 minutes and then check them every 5 minutes until they seem done.
My inspiration
This recipe was actually born out of a craving for bread.
All I could think about non-stop was eating bread, but I’ve been staying as gluten-free / grain-free as I can recently, so I didn’t want to just scarf down a whole bunch of toast.
But then I noticed the ripe bananas that seemed to keep collecting in our kitchen, and had a light bulb moment. Banana bread!
So naturally, I went looking for recipes, and was sad to discover that most recipes I could find, although vegan, still weren’t really that healthy – too much sugar, lots of flour, that kind of thing.
Using a few of my favourite recipes for inspiration (see below), I went back to the drawing board to design my perfect vegan banana bread recipe – gluten-free, low-sugar and using as many whole, unprocessed ingredients as possible.
I’m pretty happy with the result, even if I do say so myself.
And I think you’ll be super impressed too.
Resources
Here’s some of my favourite vegan and paleo banana bread recipes that I found along the way and used for inspiration:
- One Bowl Vegan Banana Bread @ Oh She Glows
- One Bowl Gluten Free Banana Bread @ Minimalist Baker
- Vegan Banana Bread with Walnuts @ Where You Get Your Protein
- Paleo Banana Bread @ Civilized Caveman Cooking
And have a super sweet day!


10 comments
Shaina
Have you ever made this with store-bought almond “flour”? I have loads of that sitting around and want to use it in something. It’s basically almond meal that has had the oil pressed out. I think I’ll try it and report back.
Nikki Stokes, Eating Vibrantly
Hi Shaina,
No, I haven’t tried this with store-bought almond flour. It’s definitely worth a try though.
It may change the texture or moisture levels a bit, but let me know how it goes!
Liz
Hi Nikki
I love this recipe – thank you for providing one without sugar and flour. I tried it for the first time yesterday and it is delicious. However, even after baking for the first 45 mins it was burnt on top. I put the foil on and after another 60 mins it was burnt all over! The middle was good though :-D
I am in the UK and have a fan-assisted oven. Maybe 180 degrees was too high… I might try it lower and put the foil on for the first part and take it off at the end.
Nikki Stokes, Eating Vibrantly
Hi Liz,
Thanks for the feedback.
My oven is gas, but not fan-forced and cooks things horribly unevenly, so maybe that’s why mine didn’t burn the same as yours.
I’d definitely try a lower temperature, and leaving the foil on for longer – the only reason for taking it off it is to get it to brown, and it seems like you don’t need that.
Let me know how you go!
Liz
Hi Nikki
Thanks for replying :-)
I will do that! I realise now where I went wrong – I had it without the foil, then put the foil on, rather than take the foil off near the end! Misunderstood your instructions.
Despite everything, the family still ate it very quickly!
Best wishes,
Liz
Nikki Stokes, Eating Vibrantly
My apologies, I explained that VERY poorly in the recipe! I’ve now updated it for clarity. Glad it was still delicious!
Emily Samansky
I make these as muffins. They are absolutely wonderful! I can’t believe how much they taste like traditional banana bread. For my son’s birthday, I iced them with a mixture of dates, cashews, and vanilla that I let soak and then blended in the high powered blender. Thanks so much for a great recipe.
Nikki
Hi Emily,
I love the idea of turning these into muffins. Your wholefood icing sounds amazing too.
It really does taste just like traditional banana bread, without the refined sugar, doesn’t it? That’s why I love this recipe.
HH
This is a great recipe. I tried it. The taste was perfect for me. However the exterior of the cake was burnt (not too much but burnt enough). I wonder if the temperature should be set to 350F or 325F. 375F seems a bit high. 180C converts to 356F. I will try again with a lower temperature.
Nikki
Hi HH,
Thank you so much for your feedback. You’re right that 375F is too high. I made a mistake with my temperature conversion and I’ve now updated the recipe with the correct temperature as you noted.
I’m also glad that despite the burnt exterior, the taste was still great. It really is my favourite health banana bread recipe!